How to Secure a VPS Server: 10 Ubuntu 24.04 Steps, and Docker Can Bypass UFW
Web Hosting & Servers 14 min read By Xavio Thomas
In this articleTable of contents15
Last updated: 10 October 2026
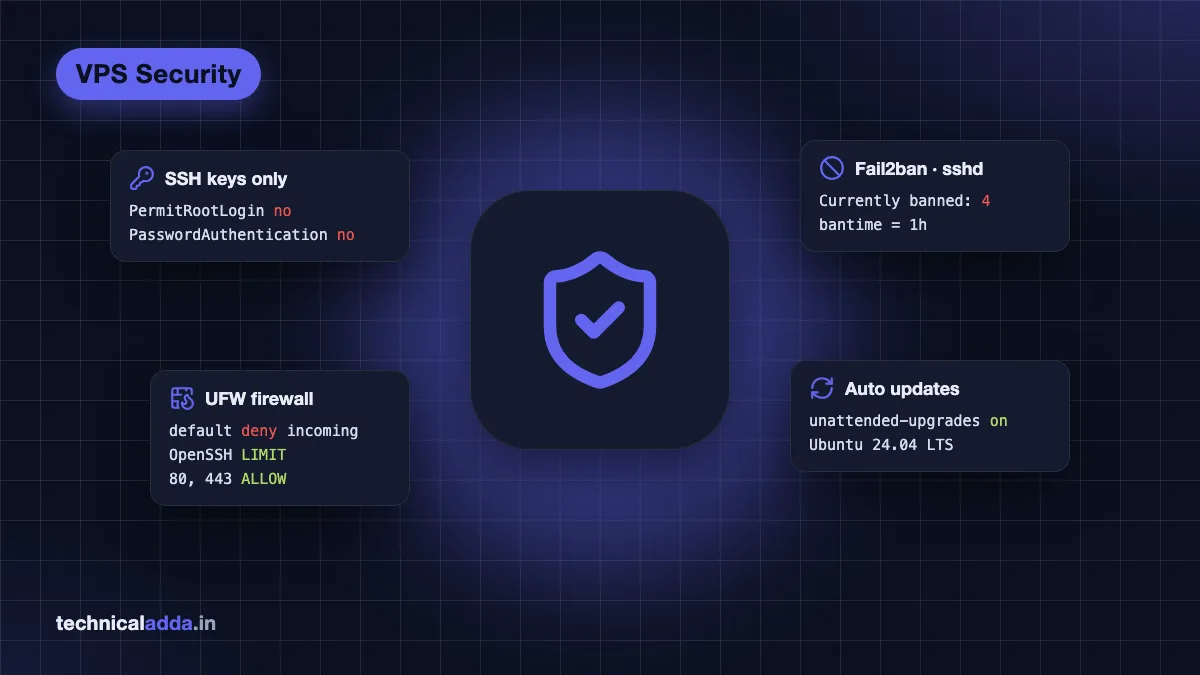
The moment your new VPS gets a public IP address, bots start knocking. Within minutes your SSH log fills with login attempts for users like root, admin and test. If you are wondering how to secure VPS server setups without becoming a full-time sysadmin, this checklist is for you. It covers the essentials for Ubuntu 24.04 LTS, in the order you should do them: automatic security updates, a non-root sudo user, SSH keys, disabling password and root login, the UFW firewall, Fail2ban, optional SSH port changes, backups, monitoring and basic DDoS protection. Every command has a one-line explanation, and the risky steps include lock-out warnings.
Quick answer: To secure a VPS server, update it and enable unattended security upgrades, log in as a non-root sudo user with SSH keys, disable root and password login, allow only needed ports with UFW, install Fail2ban, take automatic off-server backups, and monitor logs and uptime. Put websites behind Cloudflare for basic DDoS protection.
Before you start: avoid locking yourself out
Hardening SSH and the firewall on a remote server can cut off your own access if you make a mistake. Follow these rules:
- Keep one SSH session open while you change SSH or firewall settings. Test in a second terminal before closing the first.
- Know your provider's web console (VNC/serial console in Hostinger, Contabo, AWS, DigitalOcean panels). It works even when SSH is broken.
- Take a snapshot before major changes if your provider offers it.
This guide assumes Ubuntu 24.04 LTS and that you can already log in. If not, read how to connect to a VPS using SSH first. If this is a brand-new server, do the basics in our Ubuntu VPS initial server setup guide, then come back here for deeper hardening.
The VPS security checklist at a glance
| # | Task | Protects against | Time |
|---|---|---|---|
| 1 | Updates + unattended-upgrades | Known vulnerabilities | 5 min |
| 2 | Non-root sudo user | Mistakes and full-system compromise | 3 min |
| 3 | SSH key login | Password guessing | 5 min |
| 4 | Disable root and password login | Brute-force attacks | 5 min |
| 5 | UFW firewall | Exposed services and databases | 5 min |
| 6 | Fail2ban | Repeated login attempts | 5 min |
| 7 | SSH port change / IP restriction | Log noise, scanning bots | 5 min |
| 8 | Backups and snapshots | Ransomware, deletion, bad updates | 15 min |
| 9 | Monitoring and audits | Silent compromise, downtime | 10 min |
| 10 | Cloudflare / rate limits | DDoS and bot floods | 15 min |
Step 1: Update and enable automatic security updates
Unpatched software is the most common way servers get compromised.
sudo apt update && sudo apt full-upgrade -y
This refreshes the package list and installs all available updates.
sudo apt install unattended-upgrades
This makes sure the automatic update tool is installed (it is installed by default on Ubuntu Server).
cat /etc/apt/apt.conf.d/20auto-upgrades
This shows the schedule; both lines should end with "1", meaning updates run daily.
sudo unattended-upgrade -v --dry-run
This simulates an automatic upgrade so you can confirm it works.
By default only security updates are installed automatically, and reboots are off. To allow automatic reboots at a quiet time (for kernel updates), edit /etc/apt/apt.conf.d/50unattended-upgrades and set:
Unattended-Upgrade::Automatic-Reboot "true";
Unattended-Upgrade::Automatic-Reboot-Time "03:30";
This reboots at 3:30 am server time only when an update requires it. Skip this if a reboot would break something important.
These settings follow Ubuntu's automatic updates documentation (opens in new tab). Canonical also offers Ubuntu Pro, which extends security patches to thousands of extra packages; according to ubuntu.com/pro (opens in new tab), it is free for personal use on up to 5 physical machines. How a rented cloud VPS counts is not spelled out there, so read the Ubuntu Pro FAQ (opens in new tab) or ask Canonical before relying on it for a VPS. You do not need Pro for the steps in this guide: security updates for Ubuntu's main packages are free for every 24.04 server.
Step 2: Use a non-root sudo user
Logging in as root means every typo runs with full power, and attackers always try root first.
sudo adduser deploy
This creates a new user called deploy (choose your own name) and asks for a password.
sudo usermod -aG sudo deploy
This adds the user to the sudo group so it can run admin commands.
Some providers (AWS, Oracle) already give you a non-root user like ubuntu. That is fine. Use it and skip creating another one.
Step 3: Secure VPS SSH with key login
SSH keys are far stronger than passwords. You keep a private key on your device; the server stores only the public key.
On your own computer, create a key pair. This works in Windows PowerShell, Mac Terminal, Linux and Termux on Android:
ssh-keygen -t ed25519 -C "[email protected]"
This creates an Ed25519 key pair; add a passphrase when asked for extra protection.
Copy the public key to the server. On Mac, Linux and Termux:
ssh-copy-id deploy@YOUR_SERVER_IP
This appends your public key to the user's ~/.ssh/authorized_keys on the server.
On Windows PowerShell (no ssh-copy-id by default):
type $env:USERPROFILE\.ssh\id_ed25519.pub | ssh deploy@YOUR_SERVER_IP "mkdir -p ~/.ssh && chmod 700 ~/.ssh && cat >> ~/.ssh/authorized_keys && chmod 600 ~/.ssh/authorized_keys"
This sends your public key to the server and sets safe permissions.
PuTTY users can generate keys with PuTTYgen and paste the public key line into ~/.ssh/authorized_keys on the server.
Test it: open a new terminal and run ssh deploy@YOUR_SERVER_IP. You should log in without the account password (only your key passphrase, if set). Do not continue until this works.
Step 4: Disable root and password login
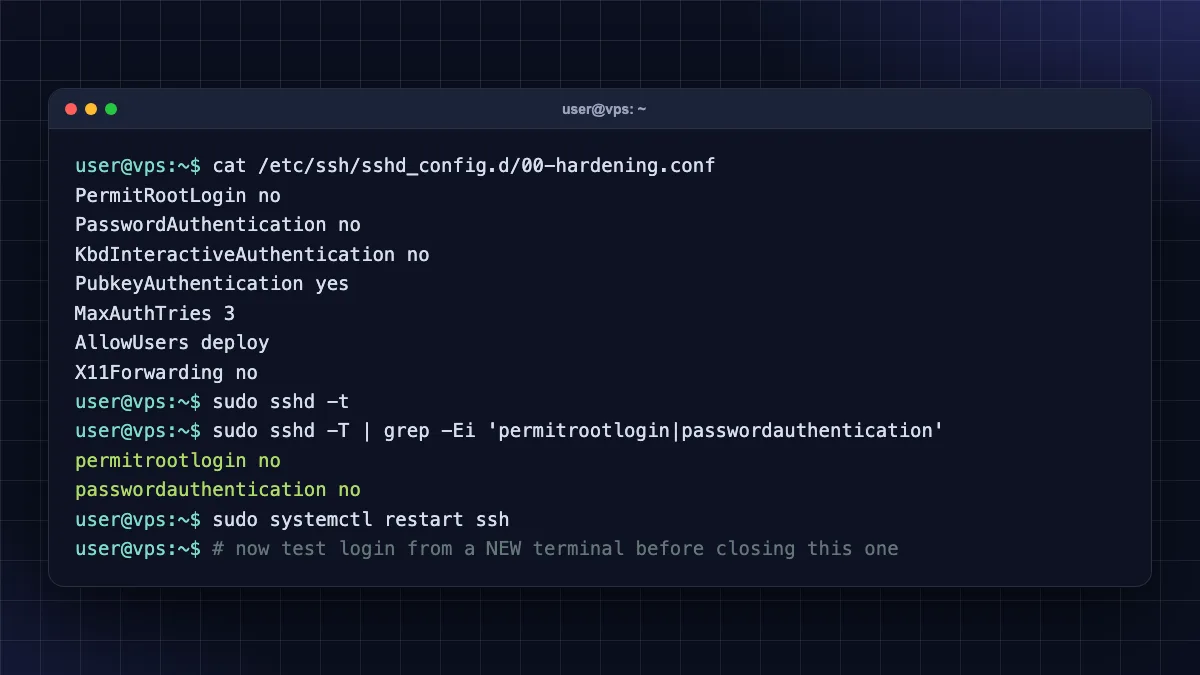
Now tell SSH to accept only keys and refuse root. On Ubuntu 24.04, the main config file loads drop-in files from /etc/ssh/sshd_config.d/ first, and SSH uses the first value it finds. Some cloud images include a file like 50-cloud-init.conf that turns password login back on. Naming your file 00-hardening.conf makes sure your settings win.
sudo nano /etc/ssh/sshd_config.d/00-hardening.conf
This creates a new SSH settings file.
Paste:
PermitRootLogin no
PasswordAuthentication no
KbdInteractiveAuthentication no
PubkeyAuthentication yes
MaxAuthTries 3
AllowUsers deploy
X11Forwarding no
These lines block root login, block password logins, allow only key logins, limit attempts and allow only the deploy user (replace with your username; add more names separated by spaces).
sudo sshd -t
This checks the configuration for errors; no output means it is valid. If it complains about a missing /run/sshd directory, run sudo systemctl start ssh and check again.
sudo sshd -T | grep -Ei 'permitrootlogin|passwordauthentication'
This prints the settings SSH will actually use; both should say no.
sudo systemctl restart ssh
This restarts SSH with the new settings.
Now test in a new terminal before closing your current session. Try ssh root@YOUR_SERVER_IP too. It should be refused.
Step 5: Turn on the UFW firewall
UFW (Uncomplicated Firewall) is included with Ubuntu. The idea: deny everything incoming, then allow only what you need.
sudo ufw default deny incoming
This blocks all incoming connections by default.
sudo ufw default allow outgoing
This lets the server reach the internet for updates and APIs.
sudo ufw limit OpenSSH
This allows SSH but temporarily blocks an IP that opens too many connections in a short time (UFW's rate-limit rule).
sudo ufw allow 'Nginx Full'
Run this only for a web server; it opens ports 80 and 443 (use 'Apache Full' for Apache).
sudo ufw enable
This turns the firewall on; type y to confirm.
sudo ufw status verbose
This lists the active rules so you can double-check.
Never open database ports (MySQL 3306, PostgreSQL 5432, Redis 6379, MongoDB 27017) to the internet. Apps on the same server connect over localhost.
Docker warning: ports published with Docker (-p 8080:80) can bypass UFW rules, because Docker writes its own firewall rules. Bind containers to 127.0.0.1 (for example -p 127.0.0.1:5678:5678) and put a reverse proxy in front. See Docker's packet filtering and firewalls documentation (opens in new tab) for details. This matters for self-hosted tools like n8n, and our install n8n on VPS guide follows this pattern.
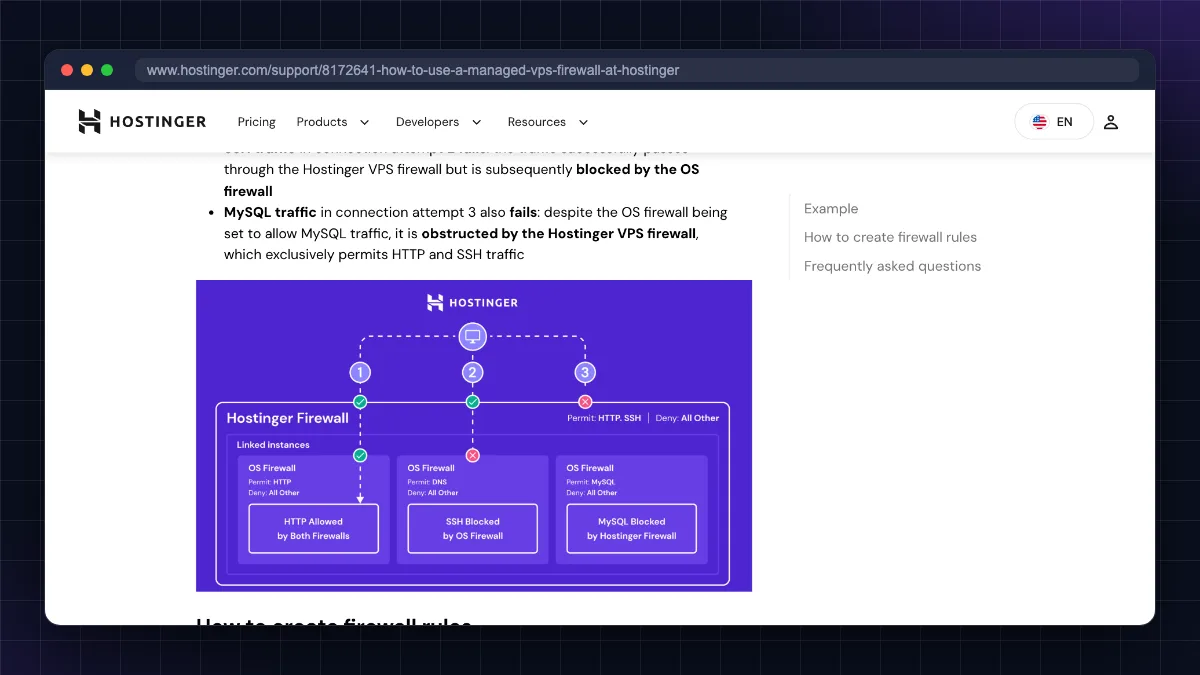
Many providers also offer a cloud firewall in their dashboard (AWS Security Groups, Oracle Security Lists, Hostinger and Contabo firewalls). Use both: the cloud firewall blocks traffic before it reaches your VPS.
Step 6: Install Fail2ban
Fail2ban reads logs and temporarily bans IPs that fail login repeatedly. On Ubuntu 24.04, make sure the system is updated first: the original 24.04 package had a Python 3.12 bug that was fixed in update 1.0.2-3ubuntu0.1 (June 2024).
sudo apt install fail2ban
This installs Fail2ban; Ubuntu enables an SSH jail by default.
sudo nano /etc/fail2ban/jail.local
This creates your own settings file (never edit jail.conf, which updates overwrite).
Paste:
[DEFAULT]
bantime = 1h
findtime = 10m
maxretry = 5

[sshd]
enabled = true
port = ssh
This bans an IP for one hour after 5 failures within 10 minutes. If you change the SSH port later, replace ssh with the number, e.g. port = 2222.
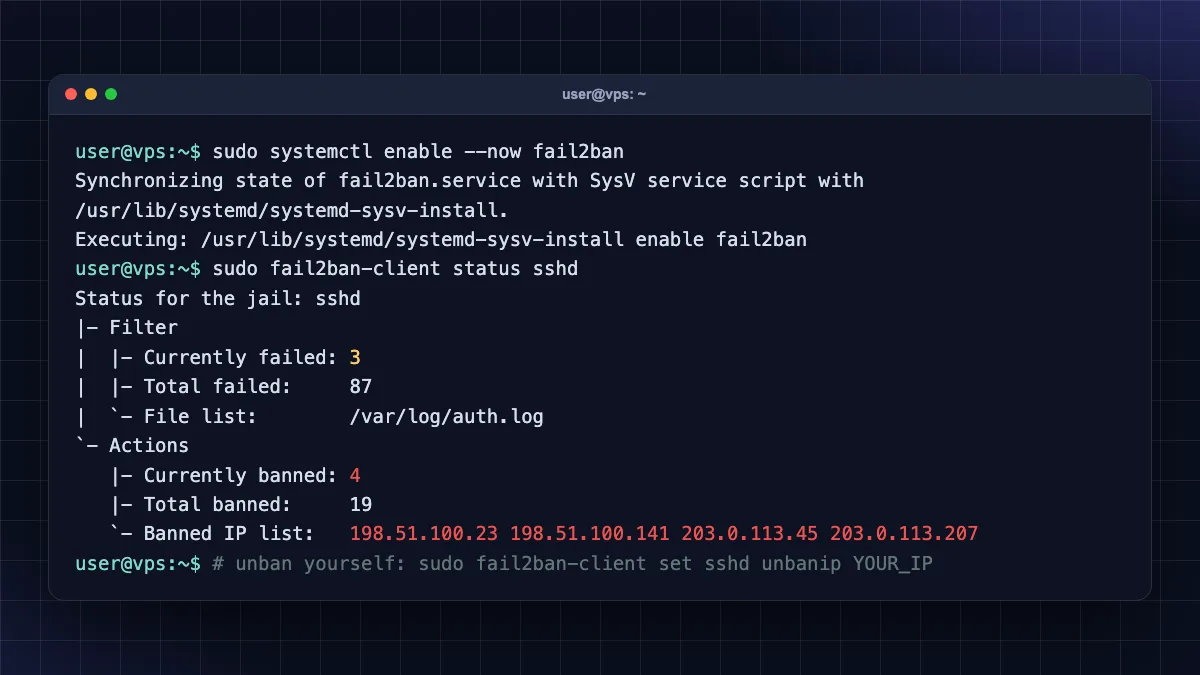
sudo systemctl enable --now fail2ban
This starts Fail2ban now and on every boot.
sudo fail2ban-client status sshd
This shows how many IPs are currently banned.
Accidentally banned yourself (common on Jio/Airtel mobile data, where IPs change)? Use the provider console and run sudo fail2ban-client set sshd unbanip YOUR_IP.
Step 7: Change or restrict the SSH port (optional)
Changing SSH from port 22 to something like 2222 does not make SSH unbreakable, but it cuts most automated bot noise from your logs. Key-only login (Step 4) is the real protection.
Ubuntu 24.04 uses socket activation for SSH: ssh.socket listens on the port and starts the SSH service when someone connects. A systemd generator reads the Port setting from /etc/ssh/sshd_config, so you must reload systemd and restart the socket after changing it.
sudo ufw allow 2222/tcp
This opens the new port first so you are not locked out.
sudo nano /etc/ssh/sshd_config
Find #Port 22, change it to Port 2222 and save.
sudo systemctl daemon-reload
This makes systemd regenerate the socket settings from the new config.
sudo systemctl restart ssh.socket
This makes SSH listen on the new port. If systemctl is-active ssh.socket says inactive (some provider images disable socket activation), run sudo systemctl restart ssh instead.
sudo ss -tlnp | grep -E ':22|:2222'
This confirms which port SSH is listening on.
Test with ssh -p 2222 deploy@YOUR_SERVER_IP in a new terminal. Only then remove the old rule with sudo ufw delete limit OpenSSH and add sudo ufw limit 2222/tcp. Also update the cloud firewall and Fail2ban's port line. This procedure matches Ubuntu's 24.04 release notes (opens in new tab) (a systemd generator builds ssh.socket from sshd_config and the sshd_config.d/ snippets) and the fix note for Launchpad bug 2069041 (opens in new tab): after changing Port, ListenAddress or AddressFamily, run daemon-reload and restart ssh.socket; restarting ssh.service alone does not move the port.
Better: restrict who can reach SSH
- Allow only your IP in the cloud firewall. This is tricky in India because Jio and Airtel home connections often change IP addresses.
- Use a private network like Tailscale or WireGuard. Allow SSH only from the VPN interface, and the SSH port disappears from the public internet entirely.
Step 8: Backups and snapshots
Security is not only about keeping attackers out; it is about recovering when something goes wrong. Follow the 3-2-1 idea: three copies, two different storage types, one off the server.
- Provider snapshots: take one before big changes. Check whether automatic backups are included or paid (for example, some budget providers charge extra for automated backups).
- Off-server backups: use tools like
resticorborgbackupto send encrypted backups of/etc,/var/wwwand database dumps to object storage or another server. - Database dumps: schedule
mysqldumporpg_dumpwith cron before the file backup runs. - Test a restore at least once. A backup you cannot restore is not a backup.
| Backup type | Protects against | Weakness |
|---|---|---|
| Provider snapshot | Bad updates, config mistakes | Stored with the same provider/account |
| Off-site encrypted backup | Account loss, ransomware, provider outage | Needs setup and testing |
| Database dump | Data corruption | Must be scheduled and rotated |
Step 9: Monitoring and audits
You cannot fix what you do not notice.
sudo journalctl -u ssh --since today
This shows today's SSH log entries, including failed logins.
last -a | head
This lists recent successful logins and where they came from.
sudo ss -tulpn
This shows every listening port and the program using it; close anything you do not recognise.
sudo apt install lynis && sudo lynis audit system
This runs a free security audit and lists hardening suggestions.
Also:
- Set up an uptime monitor (UptimeRobot, Better Stack or self-hosted Uptime Kuma) to alert you by email or Telegram when the site goes down.
- Watch CPU and bandwidth graphs in your provider panel. A sudden 100% CPU at night may mean a crypto-miner.
- Keep WordPress, plugins, Node.js apps and Docker images updated. Most real-world compromises come through the application, not SSH.
Step 10: DDoS and web-app basics
Small VPS plans cannot absorb large DDoS attacks on their own. Practical steps:
- Put websites behind Cloudflare (free plan includes DDoS protection and hides your server IP). Then allow ports 80/443 only from Cloudflare IP ranges if you want to go further.
- Use HTTPS everywhere: see our free SSL certificate for website guide.
- Rate-limit logins and APIs in Nginx (
limit_req) or with a WordPress security plugin. - Choose a provider with network DDoS protection. Most major VPS providers include basic protection; check before buying. Our best VPS hosting in India guide compares this.
- Do not expose admin panels (phpMyAdmin, n8n editor, Portainer) publicly without authentication; put them behind a VPN or at least strong passwords and 2FA.
If you want less of this work, a managed host handles patching and firewalls for you. Prefer to stay unmanaged and save money? Providers like give lots of RAM for the price but expect you to do everything in this checklist yourself, so read our Contabo VPS review first. adds a built-in panel firewall and snapshots, which helps beginners, but renewals cost more than the first term.
The hardening steps you should not skip
- Keep one SSH session open and know your provider's web console before changing SSH or firewall settings.
- Enable unattended security upgrades and use a non-root sudo user with SSH keys.
- Disable root and password login using a
00-drop-in file so cloud-init settings cannot override it. - Allow only required ports with UFW, never expose databases, and remember Docker can bypass UFW.
- Fail2ban, backups with tested restores and simple monitoring catch what prevention misses.
- Use Cloudflare and provider DDoS protection for websites; changing the SSH port is optional noise reduction.
Start with SSH keys and the firewall, then automate the rest
Learning how to secure VPS server installations is mostly about doing a few simple things early and consistently: patches on autopilot, keys instead of passwords, no root login, a tight firewall, Fail2ban, real backups and basic monitoring. Do them on day one and your Ubuntu 24.04 VPS will be safer than most servers on the internet. Setting up a fresh server? Start with the Ubuntu VPS initial server setup walkthrough, or explore more guides in Web Hosting & Servers.
FAQ
Frequently Asked Questions
How do I secure my VPS server?
Update the server and enable automatic security updates, create a non-root sudo user, switch to SSH key login, disable root and password login, enable the UFW firewall with only needed ports, install Fail2ban, set up off-server backups and monitoring, and put websites behind Cloudflare. Test each SSH change in a new terminal before closing your session.
Is a VPS secure by default?
No. Most unmanaged VPS plans come with root login, password authentication and no firewall enabled, so bots start guessing passwords within minutes. The isolation between customers is strong, but your server's own configuration is your responsibility. Managed VPS plans handle much of the hardening for you.
How do I disable root login on Ubuntu 24.04?
Create /etc/ssh/sshd_config.d/00-hardening.conf with "PermitRootLogin no" and "PasswordAuthentication no", run "sudo sshd -t" to check for errors, then "sudo systemctl restart ssh". Make sure a non-root sudo user can log in with an SSH key first, and test in a new terminal before closing your current session.
Should I change the default SSH port?
It is optional. Changing port 22 to something like 2222 reduces automated bot attempts and log noise, but it is not real security on its own. SSH keys, disabled password login and Fail2ban are what actually protect you. On Ubuntu 24.04, reload systemd and restart ssh.socket after changing the port, and open the new port in UFW first.
Does Fail2ban work on Ubuntu 24.04?
Yes. The original Ubuntu 24.04 Fail2ban package had a Python 3.12 compatibility bug, but it was fixed in an update. Run "sudo apt update && sudo apt full-upgrade" before installing. Then create /etc/fail2ban/jail.local with your settings, enable the service and check it with "sudo fail2ban-client status sshd".
What ports should be open on a VPS?
Only the ports your services need. Usually that is SSH (22 or your custom port) and, for websites, 80 and 443. Keep databases like MySQL, PostgreSQL, Redis and MongoDB closed to the internet and connect over localhost. Check open ports with "sudo ss -tulpn" and close anything you do not recognise.
How do I protect my VPS from DDoS attacks?
Place websites behind Cloudflare's free plan, which absorbs most attacks and hides your server IP. Choose a VPS provider with network-level DDoS protection, rate-limit logins and APIs in Nginx, and avoid exposing admin tools publicly. A small VPS cannot handle large attacks alone, so upstream protection is essential.
How often should I back up my VPS?
Back up databases at least daily and files daily or weekly, depending on how often they change. Keep at least one copy off the server, such as encrypted backups with restic or borg to object storage. Take a provider snapshot before major updates, and test restoring a backup at least once every few months.
Is it safe to use a password instead of SSH keys?
It is much riskier. Bots try thousands of common passwords on every public server, and a weak or reused password will eventually be guessed. SSH keys cannot be brute-forced in practice. If you must use passwords temporarily, make them long and unique, and install Fail2ban until you switch to keys.
How can I secure a VPS with Tailscale?
Install Tailscale on the VPS and your devices so they share a private network. Then allow SSH in UFW only on the Tailscale interface (for example "sudo ufw allow in on tailscale0 to any port 22") and remove the public SSH rule. Your SSH port disappears from the internet, but keep the provider's web console as a backup way in.
Where to buy
-
Visit official site (opens in new tab)
Contabo
-
Visit official site (opens in new tab)
Hostinger